

How To Repair A Bostitch Framing Nailer
Rebuild a Framing Nailer
Updated: Oct. 05, 2022
New life for an old tool
Go on your framing nailer in top working condition and save fourth dimension and money with a framing nailer rebuilding kit, which includes all the parts that unremarkably article of clothing out.
Yous might likewise similar: TBD
How to Rebuild a Framing Nailer process
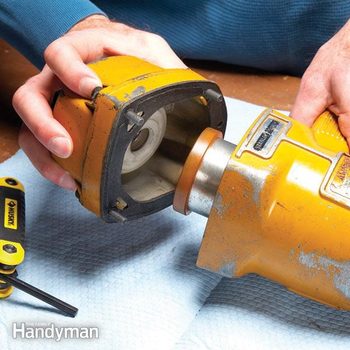
Photograph 1: Work from the top down
Remove the 4 hex screws and and so the cap. Then remove the entire cylinder and driver assembly.

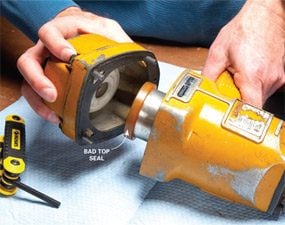
Photograph 2: Walk the band off and on
Pry up the erstwhile O-ring. So slide the round portion of the screwdriver under it. Circle the screwdriver effectually the O-ring to "walk" information technology off. Contrary the procedure to install the new, freshly greased ring.

Photo 3: Bandy out the trigger valve
Locate the scroll-pin driver tool and tap it out with a pocket-sized hammer. Then pull out the valve and install the freshly greased replacement.
Zip beats a top-quality nailer for cutting hours out of a framing projection. But all that heavy-duty nailing depends on a handful of rubber O-rings. When they fail, your projection grinds to a halt. Yous don't accept to wait a calendar week for the shop to rebuild it. You tin do the entire task yourself in nigh ii hours and salve money in the process. I'll bear witness you lot how to rebuild a Bostitch framing nailer with a master O-ring kit and a trigger valve associates. If yous have a dissimilar brand, don't worry. The rebuild is similar for others.
Framing nailers usually neglect in 1 of these ways: deteriorated O-rings that crusade air leaks, a trigger valve that won't fire, or a leaking cylinder seal or a worn driver bumper, which prevents the gun from making a complete stroke. A complete rebuild fixes all those problems. Buy the rebuild kit at a local service centre or online. It'll come up with all the O-rings and seals. If you've put a lot of nails through your gun, buy new bumpers and a trigger valve at the same time. Then download the gun schematic from the manufacturer (bostitch.com, senco.com or, for Duo-Fast and Paslode brands, itwserviceparts.com).
Start the disassembly at the cylinder cap (Photo 1). Lay out the pieces on a spotlessly make clean workbench in the order y'all removed them. Then remove the old O-rings using a blunt, straightblade screwdriver (Photo 2). Use O-ring grease (usually included in the new kit) to the new rings, then supervene upon the rings ane at a time, matching each one to its replacement. Install the new bumpers, piston seals and piston stops and reinstall the cap. So replace the trigger valve (Photo three).
Prolong the life of your air nailer past using but smash gun oil.
Required Tools for this How to Rebuild a Framing Nailer Project
Accept the necessary tools for this DIY project lined up before y'all start—you'll save time and frustration.
Required Materials for this How to Rebuild a Framing Nailer Project
Avert last-minute shopping trips past having all your materials ready ahead of time. Hither's a list.
Originally Published: October 03, 2022

How To Repair A Bostitch Framing Nailer,
Source: https://www.familyhandyman.com/project/rebuild-a-framing-nailer/
Posted by: smithplefted.blogspot.com
0 Response to "How To Repair A Bostitch Framing Nailer"
Post a Comment